How to Blend Clip In Extensions for a Natural, Seamless Finish
The most expensive set of hair extensions is a wasted investment if everyone can see exactly where they start. We have all experienced that frustrating "shelf" effect where natural hair ends abruptly against a longer layer. It kills your confidence and makes the whole look feel unfinished. Learning how to blend clip in extensions is the difference between a DIY project and a professional, salon-grade transformation.
You want hair that moves, shines, and flows as one cohesive unit. It's exhausting worrying about visible tracks or a texture mismatch every time the wind blows. This guide teaches you the strategic placement and product secrets needed for a flawless finish. We'll show you how to use a Hair Wax Stick to sleek transition points and a Silk Mist Spray for that high-shine, luxury glow. You'll master the techniques to erase the line between your natural hair and raw extensions for a look that's completely indistinguishable. It's time to achieve the seamless, natural volume you deserve in 2026.
Key Takeaways
- Prioritize high-quality raw hair to ensure your extensions possess the natural movement and longevity required for a seamless look.
- Master the "Braid-Away" method at the nape of the neck to learn how to blend clip in extensions without the natural bottom layer peeking through.
- Use a Hair Wax Stick and Silk Mist Spray to instantly erase transition lines and match the high-shine luster of your natural hair.
- Apply the "Double-Up" method to increase mid-shaft density, effectively hiding blunt cuts and preventing the dreaded "shelf" effect.
- Opt for premium Raw Clip-In Hair Extensions to achieve a professional, indistinguishable finish that boosts your confidence throughout 2026.
The Foundation of a Flawless Blend: Why Hair Quality Matters
Your journey to a seamless look starts long before you open the clips. If the hair quality is poor, no amount of styling will hide the transition. High-quality extensions mimic the natural swing and sway of your own strands. This biological movement is only possible when the hair is healthy and minimally processed. When you choose premium materials, the extensions integrate with your natural hair instead of sitting on top of it like a stiff, separate layer.
Understanding the raw vs virgin hair guide is essential for luxury results in 2026. Raw hair is completely unprocessed; it retains its natural strength and texture. Virgin hair is often steam-treated to achieve specific patterns. While both are superior to synthetic options, raw hair offers the most authentic blend because it behaves exactly like your own hair when heat-styled. It holds a curl better and moves with a fluid grace that cheaper alternatives simply cannot replicate.
Cuticle alignment is the secret to preventing the "birds nest" effect at the nape of your neck. When cuticles all face the same direction, the hair remains smooth and resists tangling. Cheap, low-grade options often strip the cuticle and coat the hair in silicone. This creates an unnatural, plastic shine that looks jarring against the soft luster of natural hair. When exploring different hair extension methods, always prioritize 100% human hair to ensure the light reflects consistently across your entire head. This consistency is what makes your extensions truly indistinguishable.
Matching Density and Weight
A common mistake in learning how to blend clip in extensions is using too few wefts. If you have thick hair or a blunt bob, a single set won't suffice. You'll end up with thin, wispy ends that look disconnected from your heavy natural layers. For a full, believable blend, you may need two sets to match the weight of your natural density. Investing in long lasting human hair bundles ensures your extensions stay thick from root to tip, even after months of wear. This density prevents the "shelf" effect where your natural hair ends abruptly.
Color Matching for Multi-Tonal Hair
Perfect color matching isn't about the roots; it's about the ends. Your extensions sit beneath your natural hair, so they must match the color where your natural hair stops. If you have a balayage or highlights, choose a multi-tonal set that incorporates those lighter hues. If the tracks are slightly visible at the top, a quick spray of root touch-up or a swipe of lace tint mousse can create a seamless, customized transition. This attention to detail ensures that the color melt looks intentional and professional rather than accidental.
Strategic Placement: The 5-Step Braid-Away Method
The most common giveaway of extensions is that stubborn bottom layer of natural hair. It peeks through the longer strands, creating a visible "step" that ruins the illusion. This "peek-a-boo" effect happens because your shortest layers at the nape of the neck don't have enough length to travel with the extensions. Mastering how to blend clip in extensions requires a professional approach to this foundation. By hiding these shorter pieces, you create a blank canvas for a seamless flow.
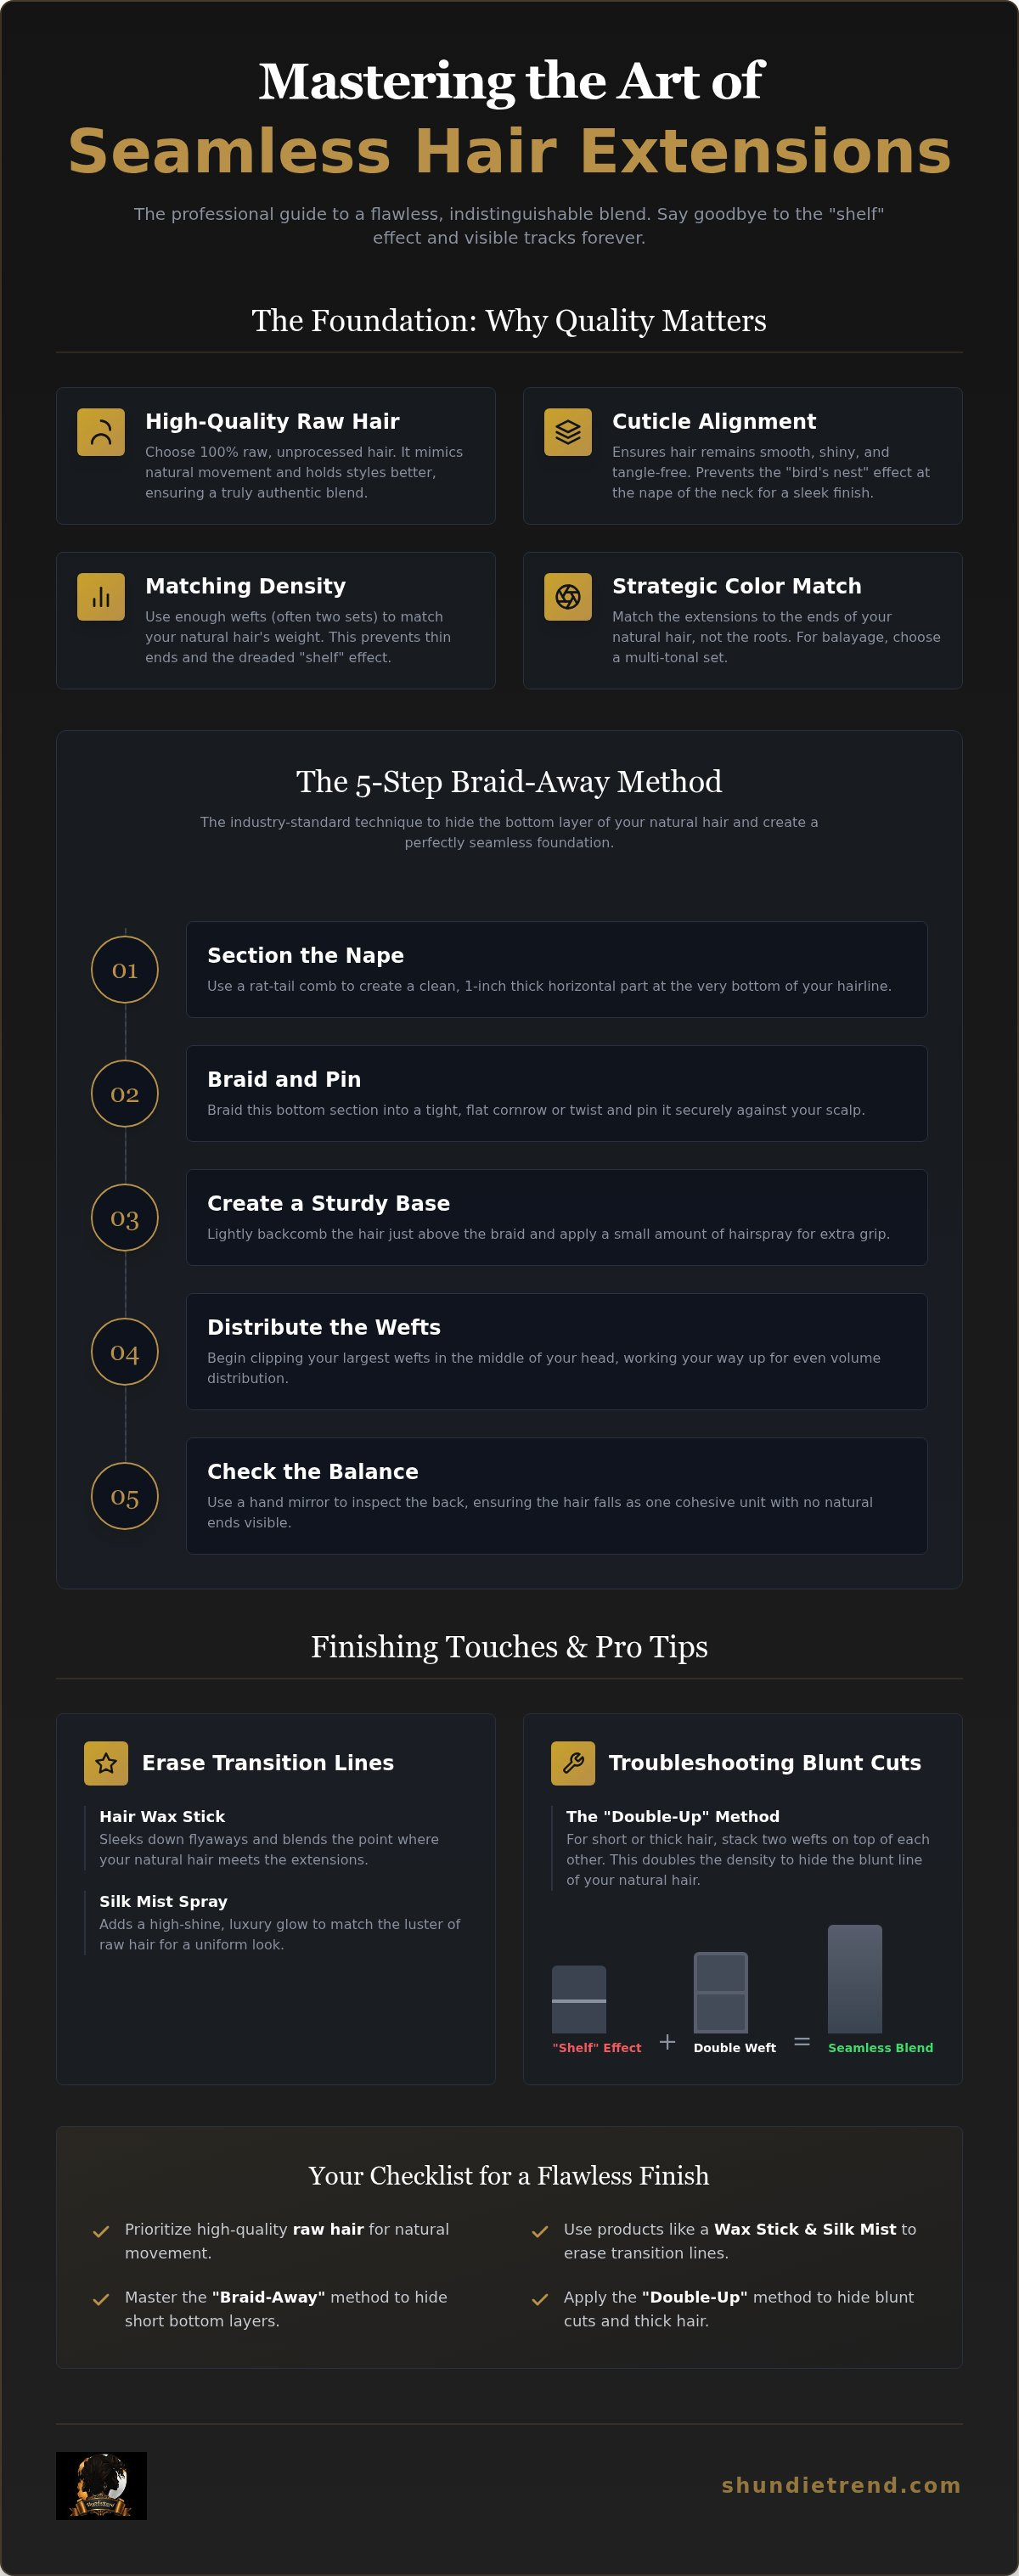
The Braid-Away method is the industry standard for a flawless transition. Follow these steps for precision results:
- Step 1: Section the Nape. Use a rat-tail comb to create a clean horizontal part at the very bottom of your hairline. This section should be about one inch thick.
- Step 2: Braid and Pin. Take this bottom section and braid it into a tight, flat cornrow or a simple two-strand twist. Pin it flat against your scalp using bobby pins. This eliminates the "shelf" before you even start clipping.
- Step 3: Create a Sturdy Base. Lightly backcomb the hair just above the braid. Apply a small amount of hairspray for grip. Utilizing safe application techniques ensures the clips stay secure without causing tension or breakage.
- Step 4: Distribute the Wefts. Begin clipping your largest wefts in the middle of the head. Work your way up, ensuring volume is distributed evenly from ear to ear.
- Step 5: Check the Balance. Use a hand mirror to inspect the back. The hair should fall as one cohesive unit with no natural ends visible.
Hiding the Tracks
The "Safe Zone" is your golden rule for invisibility. Never place a clip higher than the eyebrow line or too close to your part. This ensures enough natural hair remains on top to cover the tracks completely. For the crown, place wefts in a slightly curved "U" shape to follow the head's natural contour. Use smaller, one-clip wefts to fill in gaps around the face. This creates a soft, tapered look that mimics natural growth patterns.
The T-Shape Placement for Volume
If you have fine hair, consider a vertical "T-shape" placement on the sides. This adds instant density to the front without the bulk. Balancing the back of the head is vital to avoid a flat, unnatural appearance. For those seeking maximum impact, Raw Clip-In Hair Extensions provide the necessary weight and luster to maintain this structure all day. Proper placement ensures your style remains comfortable, secure, and entirely undetectable from every angle.
Textural Harmony: Using Products to Erase the Line
Even with expert placement, a texture mismatch can instantly reveal your secret. Natural hair often possesses a different luster, moisture level, or flyaway pattern than premium raw bundles. Achieving a professional result is about more than just clipping; it is about product integration. Learning how to blend clip in extensions means mastering the art of textural harmony to ensure your natural strands and extensions move as one.
The "marriage" technique is the final step in your styling routine. Instead of curling or straightening your extensions before application, style them while they are clipped into your head. This allows your natural hair and the extensions to pass through the heat tool simultaneously. It bonds the two textures together, creating a unified flow that resists separation throughout the day. This method is particularly effective for sleek, straight styles where every strand must be in place, providing a solution that simple curling cannot offer.
Mastering the Hair Wax Stick for Flyaways
The Hair Wax Stick is a non-negotiable tool for anyone seeking an undetectable finish. Apply the wax directly to the "shelf" where your natural hair ends and the extension begins. This creates a physical bond that prevents your shorter layers from popping out. It smooths down stubborn flyaways and blends the two distinct hair types into a singular, sleek surface. The Hair Wax Stick delivers a sophisticated, polished finish that secures the blend without a hint of heavy grease.
Finishing Touches with Silk Mist and Edge Control
Raw hair possesses a specific, light-reflective quality that signifies luxury. If your natural hair appears dull or dry by comparison, the blend will fail. Use Silk Mist Spray to add a high-shine finish that matches the luster of your extensions perfectly. This spray provides a weightless, luminous glow that enhances the aesthetic of the entire style. Sleek your hairline with Edge Control to ensure a professional, salon-grade look from the very first track.
Preserving this hard work is just as important as the initial application. Friction from cotton pillowcases can disrupt the blend and cause tangling at the transition point. Use a Satin Bonnet every night to keep your style smooth and your extensions secure. This simple step maintains the textural harmony you have created, ensuring you wake up with hair that is ready to go. By combining these strategic products, you elevate your look from a basic installation to a flawless, high-end transformation.
Troubleshooting Difficult Blends: Short Hair and Blunt Cuts
Short hair and blunt cuts present the ultimate challenge for a seamless look. The sharp, horizontal line of a bob or lob often creates a visible "shelf" that separates your natural hair from the extensions. Learning how to blend clip in extensions with these styles requires a more aggressive approach to density and placement. You don't need to cut your extensions to make them work. Instead, you need to master techniques that bridge the gap between your thick ends and the length of the bundles.
The "Double-Up" method is your best tool for increasing mid-shaft density. By stacking two wefts on a single section of hair, you create a thick wall of hair that effectively masks the blunt edge of your natural cut. This is especially vital for those with thick hair who are trying to transition to a much longer length. You can also fake the appearance of layers by angling your side wefts diagonally. This creates a tapered, cascading effect that mimics a professional cut without losing an inch of your investment. This strategic placement ensures that the hair flows naturally around your face and shoulders.
The Secret of the Tease
Security is the foundation of a successful blend, especially when your natural hair is too short to provide much coverage. Teasing a one-inch section of hair before clipping provides the necessary "grip" for the weft. For extra security, apply the Hair Wax Stick directly to the teased cushion. This creates a tacky, reliable base that prevents the extensions from sliding down throughout the day. This technique ensures your tracks stay hidden even if you are moving, dancing, or caught in the wind. It transforms a slippery surface into a sturdy anchor for your luxury hair.
Thermal Styling Tricks
If you are struggling with a visible transition, a slight wave is the ultimate "blending cheat code" for 2026. The texture of a soft curl breaks up the harsh lines of a blunt cut, allowing the natural hair and extensions to intertwine effortlessly. For those who prefer a sleek, modern aesthetic, use a flat iron to straighten your natural hair and the extensions together in small sections. This physical "marriage" of the two different hair types creates a singular, smooth surface that reflects light evenly.
Always prioritize the health of your strands by using high-quality heat protection. Raw hair is durable, but consistent thermal styling requires care to maintain its natural luster and movement. If you're ready to transform your short cut into a voluminous masterpiece, explore our collection of premium Raw Clip-In Hair Extensions to find your perfect match. With the right tools and these professional troubleshooting steps, a flawless blend is always within reach.
The Shundietrend Standard: Choosing Your Perfect Match
Mastering the art of extensions is a journey of precision and quality. You've learned the braid-away method for hiding short layers and the power of finishing products to erase texture lines. Now, the final piece of the puzzle is the hair itself. High-quality hair is the ultimate shortcut when learning how to blend clip in extensions. Without a premium foundation, even the most skilled application will feel like a constant struggle against tangles and unnatural movement.
Shundietrend's Raw Clip-In Hair Extensions are designed for the woman who demands excellence. We believe in providing a complete system rather than just a product. A truly flawless look requires a synergy between the hair and the tools used to style it. By combining our raw bundles with essential styling aids, you remove the guesswork from your beauty routine. This professional approach ensures your extensions stay indistinguishable from your natural hair from morning until night.
Why Raw Hair Wins for Blending
Raw hair is the gold standard for a reason. It offers natural movement that perfectly mimics your bio hair. Synthetic fibers often have a uniform, plastic-like swing that looks stiff and artificial. In contrast, raw human hair bundles retain their natural strength and cuticle alignment. This allows them to take heat and color effortlessly, ensuring a custom match for your unique style. They don't just look better; they possess superior longevity, maintaining their blending power wash after wash throughout 2026.
Your Seamless Style Checklist
Before you step out, run through this quick checklist to ensure your look is polished and secure. Every detail contributes to the overall illusion of natural volume and length.
- Verify the texture match: Ensure your extensions align with your natural pattern, whether it's Straight, Body Wave, or Burmese Curly Wave.
- Check the luster: Use Silk Mist Spray to give your natural hair the same high-shine finish as your extensions.
- Secure the transition: Apply the Hair Wax Stick to the point where your natural hair ends to prevent the "shelf" effect.
- Confirm the Safe Zone: Double-check that no tracks are visible around the crown or face-framing areas.
Don't be afraid to experiment with your placement. Every head shape is unique, and a slight adjustment in where you clip your wefts can create a more comfortable, custom fit. Your confidence is the best accessory you can wear. When you're ready to elevate your aesthetic, Shop Shundietrend Raw Clip-Ins and Styling Essentials to achieve the undetectable volume you deserve.
Master Your Seamless Transformation
Achieving a flawless, undetectable look is a balance of high-quality materials and professional technique. You now understand that the foundation of success lies in 100% Raw Human Hair with cuticle alignment to ensure zero tangling. Mastering how to blend clip in extensions through the braid-away method and strategic product use erases the "shelf" effect for good. Your natural hair and extensions move with a singular, fluid grace. This boosts your confidence every time you look in the mirror.
Precision styling is the final step. Use professional grade styling accessories like the Hair Wax Stick and Silk Mist Spray for that luxury glow. These tools provide the smooth, high-shine finish required for a truly indistinguishable transition. It is time to stop worrying about visible tracks. Enjoy the voluminous, natural aesthetic you deserve in 2026. Elevate your look with Shundietrend Raw Clip-In Extensions and experience the difference of premium quality. Your journey to hair perfection starts today. You have the tools, the knowledge, and the hair to make every style a masterpiece.
Frequently Asked Questions
How do you hide clip-in extensions in very short hair?
Hide them by braiding the bottom layer of your hair flat against the scalp. This technique is essential for short styles where the bottom "shelf" is most visible. Secure the braid with pins and clip the first weft directly onto it. This creates a smooth foundation that allows the longer bundles to fall naturally without short pieces peeking through. Use smaller wefts around the face for a tapered, professional finish.
Why do my hair extensions look like a "shelf" and how do I fix it?
The "shelf" occurs when there is a disconnect between your blunt ends and the length of the extensions. You can fix this by increasing density at the mid-shaft using the "Double-Up" method. Clip two wefts onto the same section of hair to create a thick wall that hides your natural ends. Mastering how to blend clip in extensions in this way ensures a smooth, seamless transition from root to tip.
Can I blend straight clip-in extensions with my naturally wavy hair?
Yes, but you must style them as a single unit to achieve a cohesive look. Use a heat tool to curl or wave your natural hair and the straight extensions simultaneously. This "marries" the two textures and prevents them from separating throughout the day. Applying a light mist of Silk Mist Spray before styling helps the hair take the shape and adds a luminous, high-end glow to the final aesthetic.
How many grams of clip-in extensions do I need for a natural blend?
For a natural blend, the weight you need depends on your natural hair's thickness and current length. Fine hair typically requires 120 to 150 grams for a subtle volume boost. If you have thick hair or a blunt bob, you will need 220 grams or more to prevent a thin, wispy appearance at the ends. Choosing the correct weight is a fundamental step in learning how to blend clip in extensions for a professional result.
Do I need to wash my clip-in extensions before I wear them?
You don't need to wash raw clip-in extensions immediately after purchase. High-quality raw hair arrives clean and ready for application. However, a gentle co-wash can help open up the hair fibers and soften the initial luster for an even more natural integration. Always use sulfate-free products to maintain the longevity and strength of the bundles. Air drying is recommended to preserve the natural movement and texture of the human hair.
What is the best product to use for blending hair extensions?
The Hair Wax Stick is the most effective tool for erasing the line between your hair and the wefts. It tames stubborn flyaways and sleeks the transition point for a polished, unified texture. Pair this with Silk Mist Spray to match the light-reflective quality of luxury bundles. Together, these products create a sophisticated finish that looks intentional and salon-grade. Edge Control is also vital for keeping the hairline sharp and professional.
Can you sleep in clip-in extensions if they are blended well?
You should never sleep in clip-in extensions, regardless of how well they are blended. The clips can pull on your natural hair follicles during the night, leading to tension and potential breakage. Remove them daily to give your scalp a rest and maintain the health of your bio hair. Store your extensions in a cool, dry place and wear a Satin Bonnet to protect your natural strands from friction while you sleep.
How do I stop my clip-in extensions from showing at the top?
Prevent tracks from showing by following the "Safe Zone" rule. Keep all clips at least two inches away from your part and hairline. This ensures you have enough natural hair to cover the wefts completely. If your hair is fine, lightly backcomb the section where you plan to clip the extension. This creates a sturdy, hidden anchor that prevents the track from sliding or becoming visible when you move your head.