How to Install Clip-In Hair Extensions: The 2026 Professional Blending Guide
A flawless hair transformation isn't just about the hair you buy; it's about the strategy you use to hide the secret. Learning how to install clip-in hair extensions with professional precision is the difference between a visible "home job" and a seamless, high-end melt. You've likely dealt with the stress of visible tracks, "bumpy" silhouettes, or extensions that feel like they might slide out at any moment. It's frustrating when your natural hair refuses to blend with premium raw textures, leaving you with a look that feels more like a costume than a crown.
We agree that you deserve better than a "good enough" installation. This guide teaches you the exact techniques needed to achieve a salon-quality finish every single time. You'll master the art of creating a secure foundation and blending straight or curly textures for a result that is entirely undetectable. We'll walk through the essential steps for all-day security, the perfect placement for maximum volume, and the finishing touches using Silk Mist Spray to ensure your Burmese curly finish is bouncy, lush, and perfectly integrated.
Key Takeaways
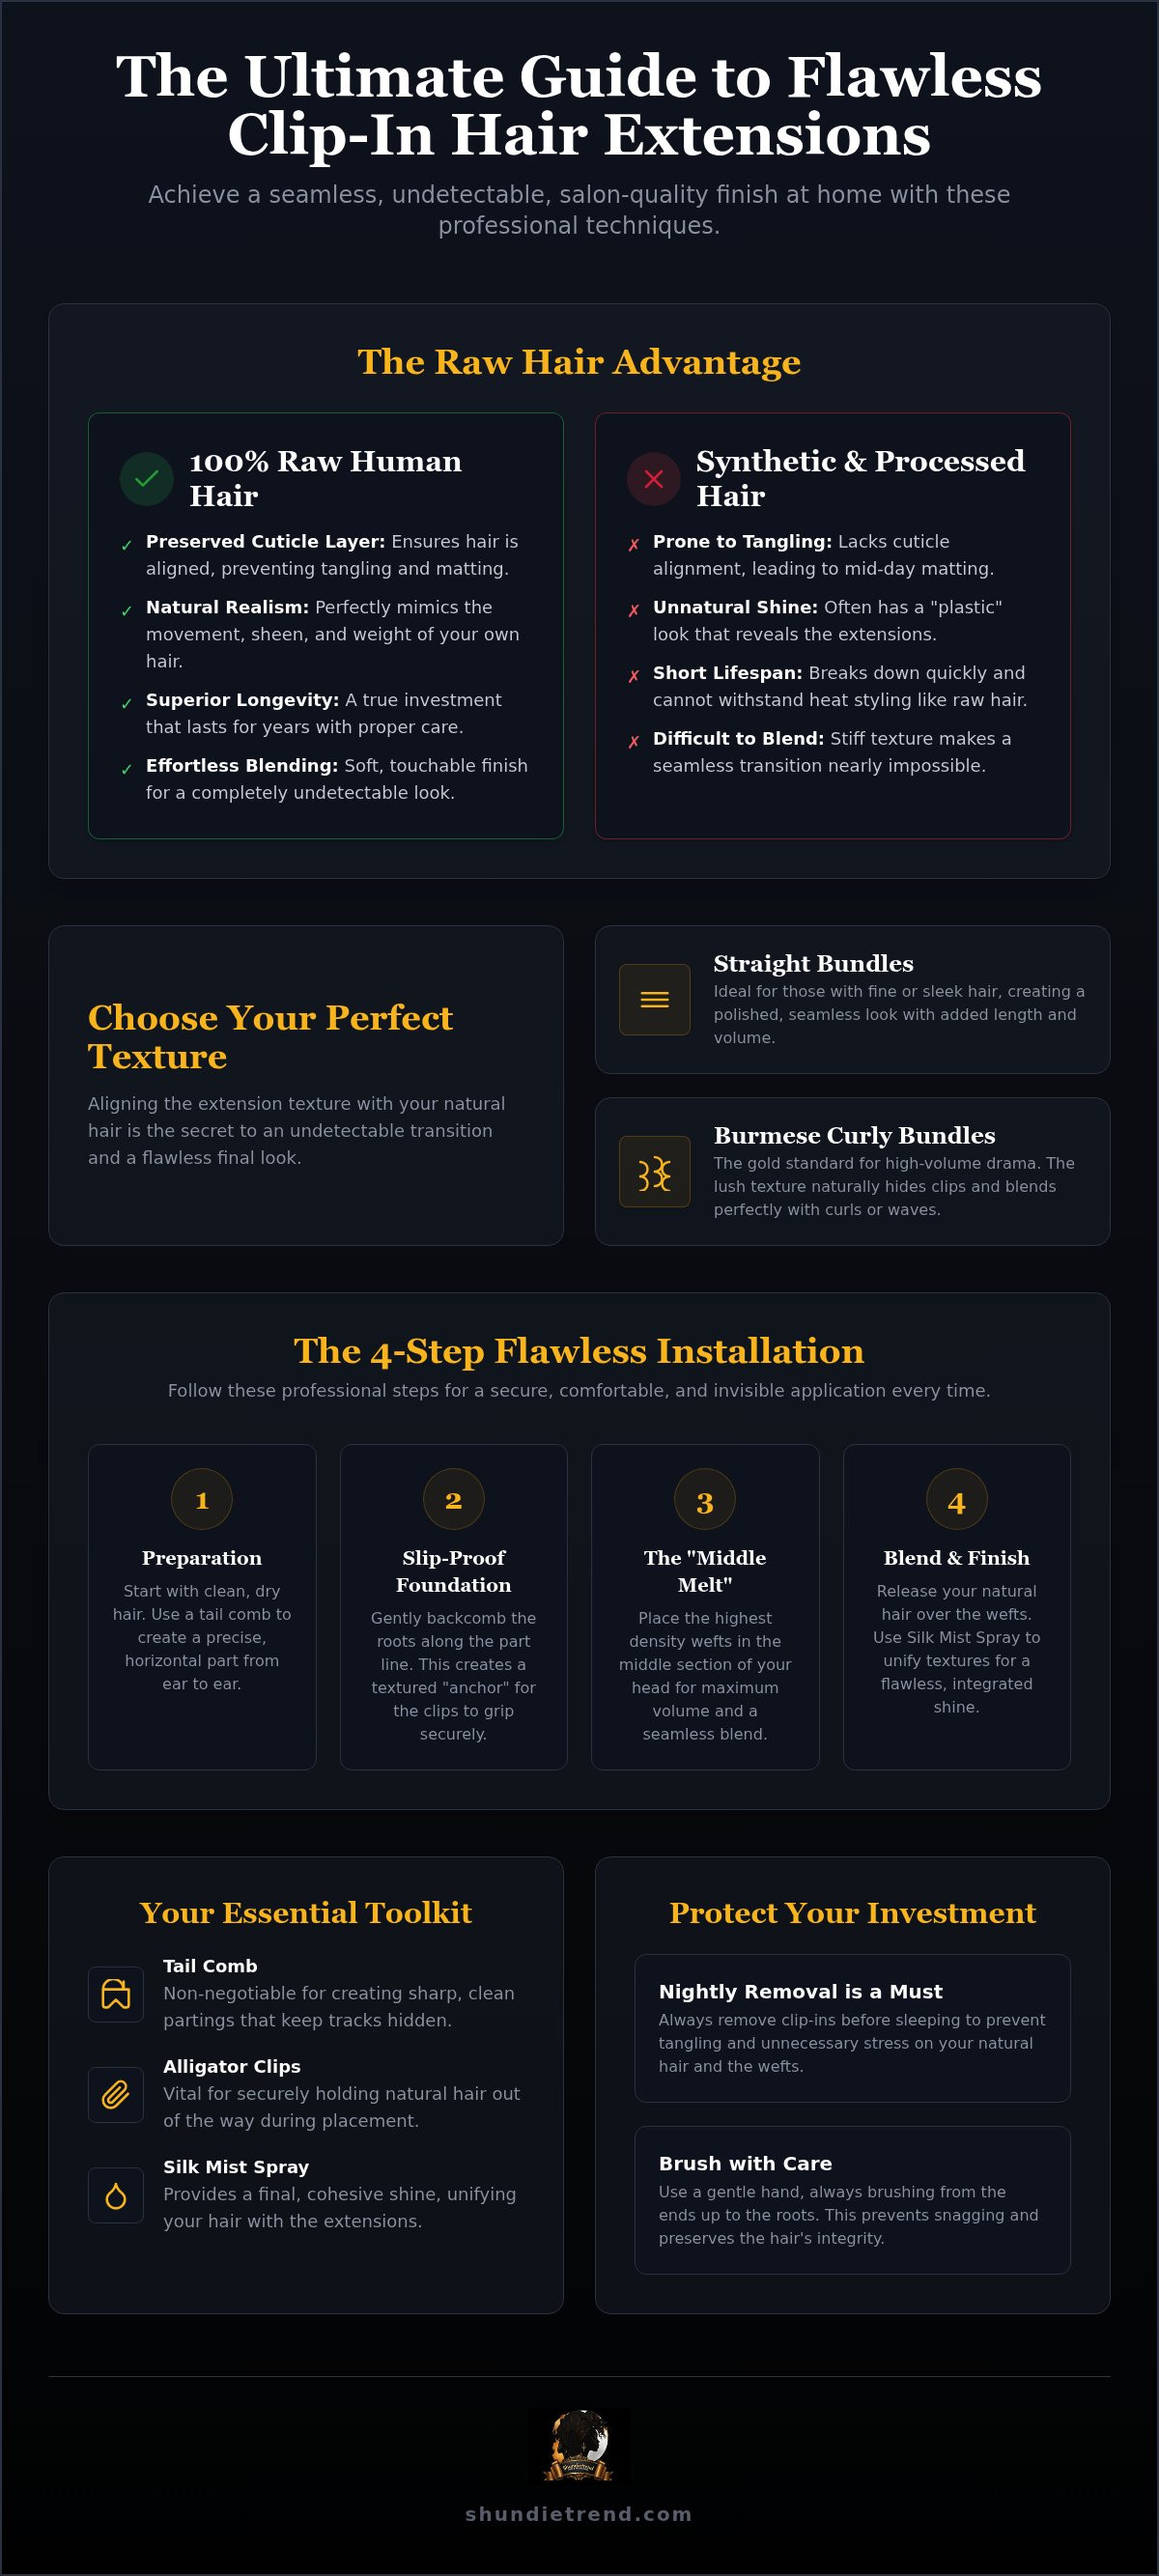
- Understand the luxury of 100% raw human hair for a natural, tangle-free finish that mimics your own texture perfectly.
- Master how to install clip-in hair extensions using a tail comb for precise parts and a secure, slip-free foundation.
- Execute the "Middle Melt" technique to place high-density wefts for maximum volume and a seamless, undetectable transition.
- Learn professional blending secrets to integrate Burmese curly textures with your natural leave-out for a flawless, voluminous result.
- Extend the life of your investment with essential maintenance tips, including nightly removal and proper brushing from ends to roots.
Why Raw Clip-In Hair Extensions are a Style Game-Changer
Raw clip-in extensions represent a shift toward high-end, temporary style. They provide a non-damaging alternative to permanent methods like glue-ins or sew-ins. You can achieve dramatic volume and length in under 10 minutes. This makes them a perfect choice for busy schedules or special events. When you learn how to install clip-in hair extensions correctly, you gain total control over your aesthetic. These aren't just accessories; they're professional tools for instant transformation.
Unlike standard store-bought sets, raw clip-ins offer a level of luxury that synthetic or heavily processed hair can't match. They're designed for the modern woman who values quality and longevity. You get the freedom to experiment with different lengths and densities without a long-term commitment. It's about enhancing your natural beauty with precision and ease.
The Raw Hair Advantage: Longevity and Realism
Quality matters when you want a flawless look. Choosing raw human hair bundles ensures your extensions behave like your natural strands. Raw hair remains in its purest state. It hasn't been chemically processed or stripped. This preserves the cuticle layer. Cuticle-aligned hair is essential; it prevents the mid-day matting and tangling common with lower-grade options.
Within the broad category of Artificial hair integrations, raw human hair stands out for its realism. It mimics the natural movement, sheen, and weight of your own hair. This makes the blending process effortless. You won't see that tell-tale "plastic" shine found in synthetic sets. Instead, you get a soft, touchable finish that lasts for years with proper care. These pieces are an investment in your confidence.
Choosing Your Texture: Straight vs. Burmese Curly
A successful installation starts with the right match. You must align the extension texture with your natural hair's density and curl pattern. This creates an undetectable transition. If you have fine, sleek hair, straight bundles offer a polished look. However, if you crave high-volume drama, Burmese curly hair bundles are the gold standard for texture and bounce.
Burmese curly textures are prized for their resilience. They provide a lush, textured appearance that blends seamlessly with natural curls or waves. When you know how to install clip-in hair extensions using these premium textures, the results are transformative. The curls hide the clips naturally. This creates a voluminous finish that looks like it grew straight from your scalp. Matching the texture ensures that even as you move throughout the day, your secret remains safe.
The Essential Toolkit for a Flawless Installation
Precision is the hallmark of a professional finish. You cannot achieve a seamless melt without the right equipment. To master how to install clip-in hair extensions, you need tools that offer control and stability. Start with a metal-ended tail comb. It is non-negotiable for creating the sharp, clean partings that keep tracks hidden. Large alligator clips are equally vital. They keep your natural hair securely out of the way. This prevents stray strands from getting caught in the clips during the snapping process. Finally, a bottle of Silk Mist Spray provides that final, cohesive shine. It bridges the gap between your natural hair and the raw extensions for a unified glow.
Preparation: Cleaning and Sectioning
Clean, dry hair is the only acceptable starting point. Natural oils or product buildup can cause clips to slide. This is especially true if you have fine or silky strands. Use the "Ear-to-Ear" rule to map out your head. This horizontal pathing ensures your wefts sit level and stay undetectable under your top layers. Alligator clips are your best friend during this process. Unlike standard hair ties, they provide a firm grip without snagging. They allow you to isolate specific rows with surgical precision. For those with shorter hair or stubborn flyaways, applying edge control for sleek styles along the hairline preps the area for a smooth, unified look. It keeps the shorter pieces from peeking through your longest extensions.
Creating a Slip-Proof Foundation
Security is a common concern for extension users. If you've ever felt a track shift, you know the anxiety it causes. The "Tease and Lock" method is your professional solution. Use your tail comb to backcomb the roots of each section gently. This creates a textured "anchor" for the clip to grab. For extra security, a quick mist of light-hold hairspray on the teased area provides instant grip. This is particularly effective for fine hair that lacks natural volume. Following a reliable guide on how to install clip-in extensions ensures you distribute the weight of the wefts evenly. Proper distribution prevents scalp tension. It keeps your installation comfortable all day. The Silk Mist Spray acts as a lightweight sealant. It helps the raw hair cuticles lay flat alongside your own. This prevents that "separated" look where the extensions and natural hair move as two different units. If you're ready to upgrade your look, explore our premium raw clip-in extensions for a luxury experience that feels as good as it looks.
Step-by-Step: How to Install Clip-In Hair Extensions
Begin your transformation at the nape of your neck. This is the foundation of how to install clip-in hair extensions with professional results. Use your tail comb to part a straight line about an inch above the hairline. Secure the smallest 2-clip weft here. This bottom layer prevents your natural hair from peeking through when you look down or tilt your head. It's a simple step that ensures your secret stays safe from every angle.
Move up to the widest part of your head for the "Middle Melt." This is where you'll place the widest 3 and 4-clip wefts. These pieces provide the bulk of your volume and length. Space them about an inch apart vertically. Always ensure you have enough natural hair between rows to act as a buffer. This layering technique creates a dense, luxurious look that mimics the natural growth pattern of high-density hair.
Side framing is the next priority. Positioning 1 and 2-clip wefts around the face adds essential volume where it's most visible. Angle these pieces slightly toward your face for a natural, tapered effect. Finally, observe the "Crown Clearance" rule. Never place a weft higher than the top of your ears or too close to your part. You need a significant "safety zone" of natural hair to cover the top tracks. This ensures the installation remains undetectable, even when you're moving or catching a breeze.
Mapping Your Wefts for Maximum Impact
A balanced look requires strategic mapping. Your set likely contains various widths designed for specific areas. Use this general guide for a symmetrical finish:
- Nape: One 2-clip weft.
- Lower Mid-Section: One 3-clip weft.
- Widest Point (Ear to Ear): One 4-clip weft.
- Upper Mid-Section: One 3-clip weft.
- Temples/Sides: Two 2-clip and two 1-clip wefts.
Avoid placing clips too close to your front hairline. This is the most common mistake that leads to visible tracks. Always check for symmetry using a hand mirror. Your profile should look consistent and full on both sides. Choosing high-quality raw hair is also a health-conscious choice. A February 2026 study by the EWG highlighted concerns regarding harmful chemicals in hair extensions found in many lower-grade, processed alternatives. Raw hair offers a safer, more natural experience.
Snapping and Securing the Clips
Execution determines the longevity of your style. Mastering the physical snap is the final hurdle in learning how to install clip-in hair extensions like a pro. Slide the comb teeth of the clip directly into the teased root you prepared during the toolkit phase. Snap the center clip first, then move to the outer edges. The weft must lie completely flat against your scalp. If you feel any "bumps" or gaps, the track isn't secure.
Perform a gentle "tug test" on every weft after snapping it shut. If the piece shifts even slightly, unclip it. Re-tease the section and try again. This extra minute of effort guarantees all-day security and a flawless, flat-laying melt. When every track feels firm and invisible, you're ready to move on to the final blending and styling steps.
Expert Secrets for Blending and Styling Your Extensions
Learning how to install clip-in hair extensions is the first step toward a new look; the true professional finish comes from a strategic blend. Integration is an art form. It requires patience and the right technique to ensure your natural hair and the extensions move as one. Use a wide-tooth comb to gently marry the layers. Start from the bottom and work your way up. This prevents unnecessary tension on the clips while effectively combining the two textures. A seamless melt is the goal.
Raw human hair is superior for blending because it retains its natural cuticle structure. Unlike synthetic or heavily processed options, raw clip-in hair extensions mimic your own hair’s response to movement and light. This creates a cohesive look that doesn't separate or look "choppy" during the day. If you're using heat tools to unify the texture, always apply a heat protectant first. Raw hair handles heat beautifully, allowing you to curl or straighten your leave-out directly into the extensions for a perfect match.
Perfecting the Burmese Curly Blend
Burmese curly textures are dense, vibrant, and full of life. To blend your natural leave-out with these curls, use the "Spiral Fusion" technique. Dampen your natural hair slightly with a mist of water or a lightweight leave-in conditioner. Take a small section of your own hair and a small section of the extension. Twirl them together around your finger to create a single, unified spiral. This technique is specifically effective for Burmese curly hair bundles. It hides the transition point perfectly. You can also add volume at the roots by gently picking the hair with a wide-tooth comb, but be careful not to expose the clips you just installed.
The Finishing Touch: Shine and Edges
Luster is the final step in a luxury installation. Once you know how to install clip-in hair extensions, you must focus on the polish. Apply Silk Mist Spray for a high-end, luminous glow. It adds a salon-quality sheen without weighing the hair down. For a truly professional crown, use a hair wax stick to sleek down any stubborn flyaways. This ensures your leave-out lays flat and smooth over the top tracks. Perform a final check with a hand mirror. Ensure the tracks are invisible from every angle, especially the back and sides. A smooth, polished crown is the hallmark of a master-level installation.
Achieve this professional, high-volume look yourself by exploring our premium raw hair extensions today.
Maintenance and Longevity: Protecting Your Investment
A successful transformation doesn't end with the mirror. Once you understand how to install clip-in hair extensions, your focus must shift to preservation. Raw human hair is a durable, high-end material; however, it requires consistent care to maintain its premium luster. The most important rule is nightly removal. Sleeping in clip-ins puts unnecessary strain on your natural roots. It can lead to thinning or breakage over time. Taking five minutes to unclip your wefts before bed ensures your natural hair remains healthy and strong.
Brushing technique is equally vital for longevity. Always use a wide-tooth comb or a soft extension brush. Start at the ends and work your way up toward the clips. This prevents snagging and minimizes shedding. When your wefts are out, store them in a dedicated space. Keeping them flat and detangled prevents the hair from developing memory kinks or matting. An organized storage routine makes your next installation faster and more efficient. It keeps your raw extensions ready for immediate use.
Washing and Conditioning Raw Wefts
Raw hair thrives with the right nutrients. Use sulfate-free shampoos and conditioners to maintain the hair's natural moisture balance. Harsh chemicals can strip the cuticles, leading to dryness and tangling. After washing, air-drying is the preferred method for raw human hair bundles. It preserves the integrity of the texture and prevents heat damage. If you must use a blow-dryer, use a low-heat setting. Finish the process by applying Silk Mist Spray. This restores the luminous glow and keeps the hair feeling soft and manageable. Treat your extensions with the same high standards you apply to your natural crown.
Nighttime Rituals for Natural Hair
Your natural hair needs protection while the extensions are resting. Edges and leave-out areas are particularly delicate. Wearing a Satin Bonnet is a non-negotiable step in your nighttime routine. It creates a smooth barrier that prevents friction against your pillowcase. This simple habit protects your edges from thinning and keeps your leave-out from tangling overnight. It ensures your natural hair is prepped and ready for when you perform your next how to install clip-in hair extensions session. Proper nighttime care maintains the health of your crown, making future blending even more effortless. Consistency is the key to a long-lasting, luxury aesthetic.
Step Into Your Most Voluminous Era
Mastering a seamless blend is about more than just clips; it's about confidence and professional precision. You've learned how to map your wefts for the "Middle Melt" and the importance of texture-matching with premium Burmese curly strands. A secure foundation starts with the simple "Tease and Lock" method. Now that you've mastered how to install clip-in hair extensions like a pro, you're ready to enjoy all-day security and a flawless, undetectable finish. Every track you snap into place is a step toward the lush, voluminous aesthetic you've always wanted.
Ready to transform your look with the highest quality hair on the market? Shop Premium Raw Clip-In Extensions at Shundietrend. Our collection features 100% Raw Human Hair that is cuticle aligned for zero shedding. We provide fast shipping across the US to ensure your luxury transformation arrives exactly when you need it. Embrace the beauty of effortless, high-end hair. Your most confident self is just a few clips away.
Frequently Asked Questions
Can I install clip-in extensions on very short hair?
Yes, you can achieve a beautiful transformation if your natural hair is at least 3 to 4 inches long. This length is necessary to provide enough "safety zone" hair to hide the tracks. When working with shorter styles, you may need a higher gram weight to ensure a seamless transition between your blunt ends and the long extensions. Strategic layering is essential for a natural, cohesive look.
How many grams of clip-in hair do I need for a full head?
A standard full-head installation typically requires between 120 and 220 grams of hair. If you have fine to medium hair, 120 to 160 grams provides natural volume and length. Those with thick hair or blunt cuts should opt for 200 grams or more to ensure the extensions don't look thin at the ends. Choosing the correct weight prevents a "choppy" appearance and ensures a lush, professional finish.
Will clip-in extensions damage my natural hair if worn daily?
Clip-in extensions are non-damaging when you follow the correct protocol for how to install clip-in hair extensions. Damage only occurs if you attach clips to weak hair or forget to remove them nightly. Always unclip your wefts before bed to prevent scalp tension and traction alopecia. By alternating your placement slightly each day and using a secure, teased anchor, you protect your natural strands from unnecessary stress and breakage.
How do I hide the clips if I have very thin hair?
Hiding clips in thin hair requires a lower placement and a strong foundation. Avoid placing any wefts too close to your part or hairline where the hair is naturally sparser. Gently backcomb your roots to create a thick, textured anchor for the clip to grab. This "tease and lock" method prevents the weight of the weft from pulling and keeps the metal clips from peeking through your fine natural layers.
Can I sleep in my clip-in hair extensions?
No, you should never sleep in your clip-in extensions. The clips are designed for temporary wear and can cause significant friction against your scalp and natural hair during the night. Sleeping in them leads to severe tangling, matting, and potential hair loss from the constant pulling. For the best results, remove your extensions nightly and store them flat. Protect your natural leave-out by wearing a Satin Bonnet instead.
How often should I wash my raw clip-in extensions?
You only need to wash your raw clip-in extensions every 15 to 20 wears, or when you notice significant product buildup. Because they don't receive natural oils from your scalp, they don't require frequent cleansing. Use sulfate-free products to maintain their moisture. After washing, apply a light mist of Silk Mist Spray to restore luster. Air-drying is the best way to preserve the cuticle-aligned integrity of your premium raw human hair.
What is the best way to blend straight clip-ins with curly hair?
The most effective way to blend different textures is by using heat tools to unify the strands. If you are learning how to install clip-in hair extensions with a texture mismatch, curl your natural hair and the extensions together once they are installed. This "Spiral Fusion" technique forces the two textures to move as one. Always use a heat protectant to keep the raw human hair soft, bouncy, and resilient throughout the styling process.
Can I dye or bleach my raw human hair clip-ins?
Yes, because our extensions are 100% raw human hair, they can be professionally colored or bleached. Unlike synthetic alternatives, raw hair takes pigment beautifully and maintains its strength. However, since the hair has been removed from its original nutrient source, we recommend consulting a professional colorist. Always perform a strand test first and follow up with a deep conditioning treatment to keep your customized wefts looking vibrant, healthy, and smooth.