Glueless Lace Frontal Installation: The 2026 Professional How-To Guide
Is your loyalty to lace glue actually costing you your natural hairline? Many enthusiasts face the silent struggle of thinning edges and stubborn, messy adhesive buildup. You want that high-end, melted aesthetic without the chemical commitment. A professional glueless lace frontal installation offers the perfect compromise. It's the ultimate solution for a secure, breathable, and realistic finish. We agree that your hair should look like it's growing from your scalp, not like it's fighting a battle with a bottle of glue.
This guide promises to help you master a flawless, adhesive-free melt that protects your natural hair. You'll achieve a seamless, professional aesthetic from the comfort of your own home. We'll cover everything from prepping high-definition lace to the precision application of lace tint mousse and edge control. Expect a fast-paced walkthrough of customization, security, and the secrets to a daily-removable style that never shifts. It's time to enjoy a look that's smooth, precise, and perfectly integrated into your routine. Get ready to elevate your style with total confidence and zero damage.
Key Takeaways
- Master the transition from messy adhesives to a precision-based melt that prioritizes scalp health and edge protection.
- Identify the essential styling tools, like lace tint mousse and edge control, needed to create a high-end, realistic hairline at home.
- Follow a detailed, step-by-step glueless lace frontal installation process that utilizes adjustable straps and tension for all-day security.
- Learn the non-negotiable preparation steps, including a flat braid down, to achieve a seamless and natural-looking foundation.
- Implement professional maintenance routines with a satin bonnet to keep your lace flat and your natural hair healthy overnight.
What is Glueless Lace Frontal Installation?
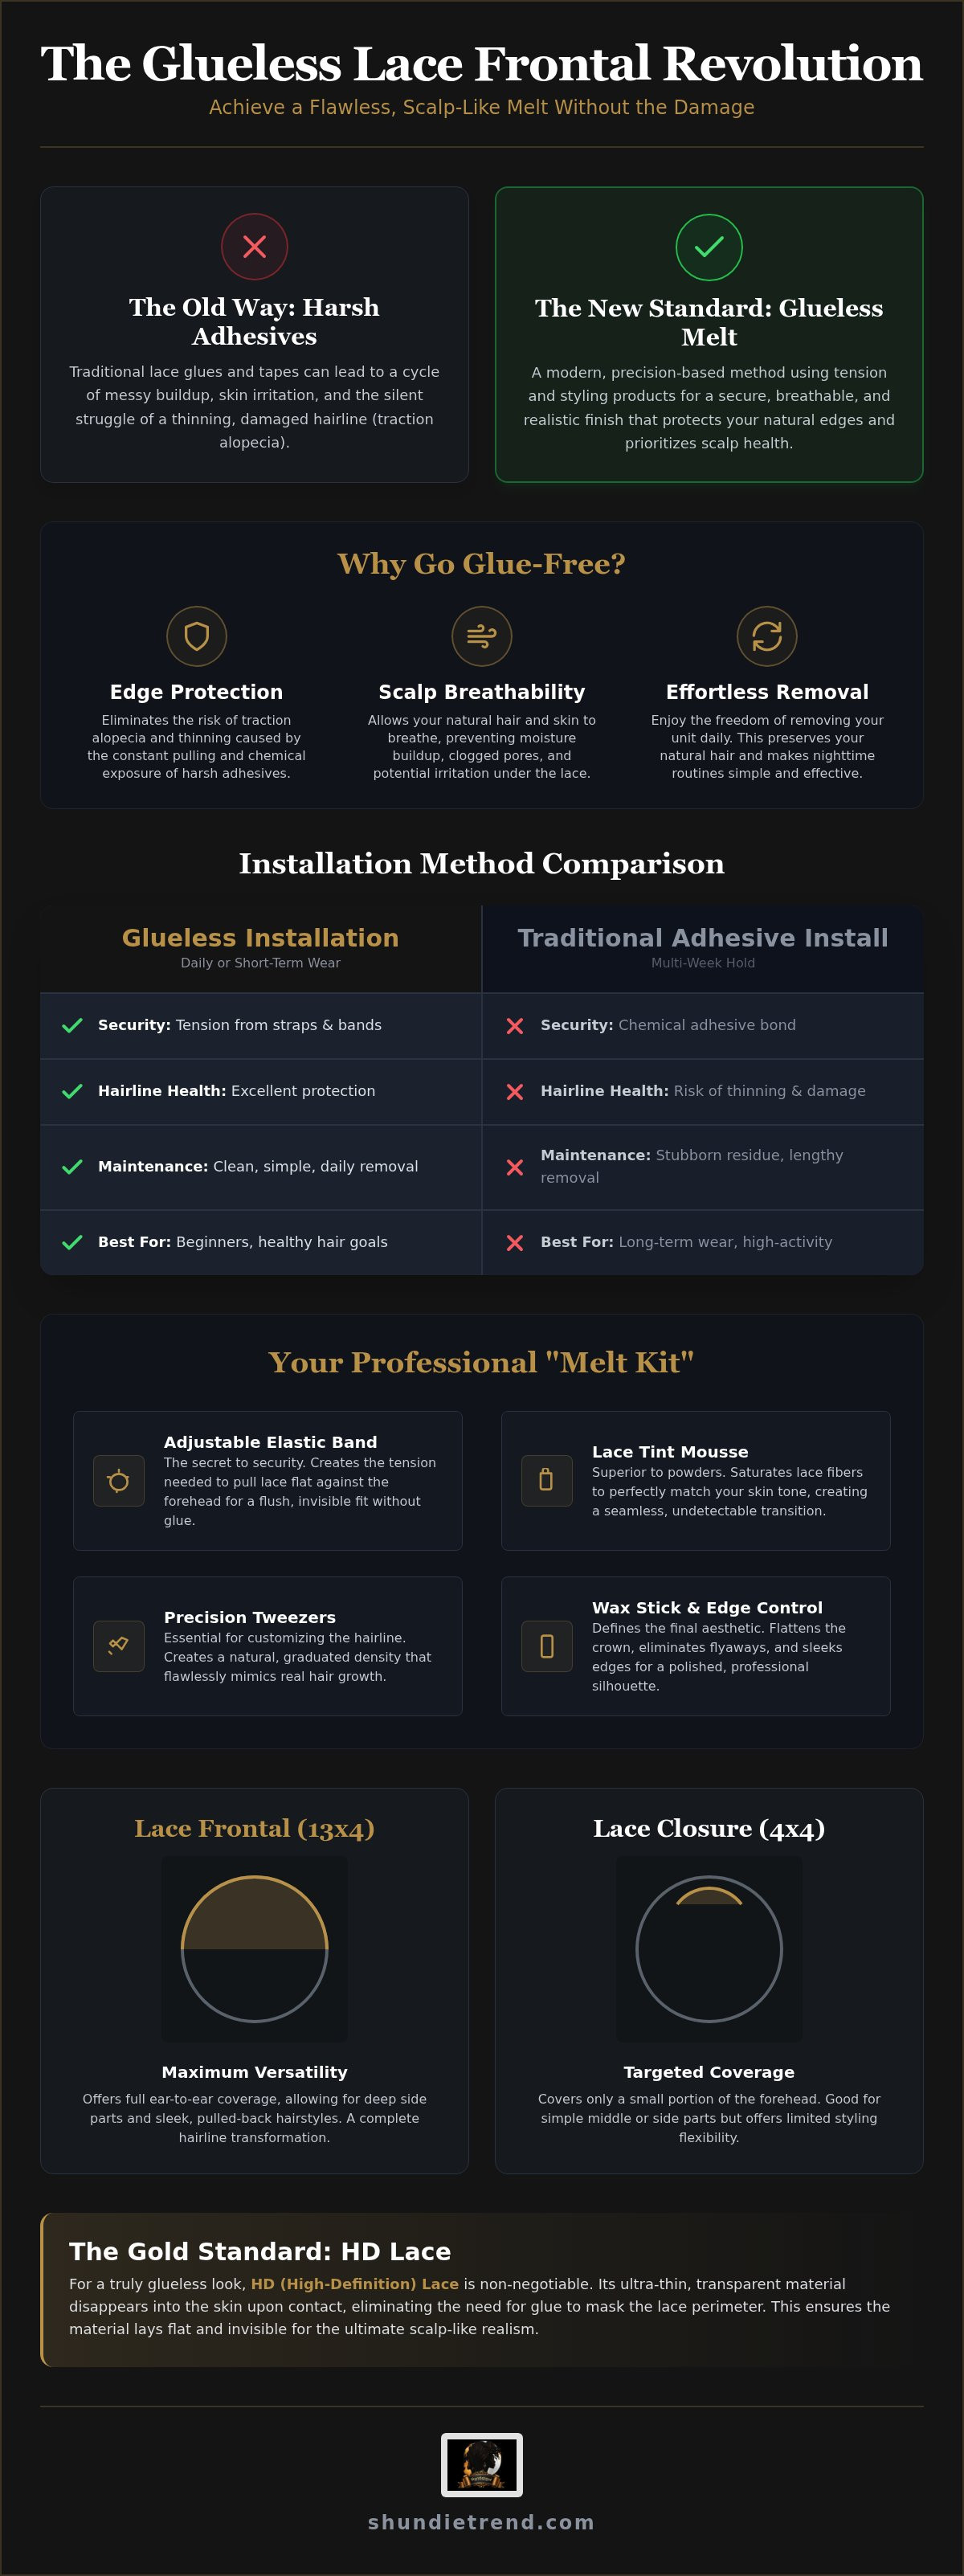
A glueless lace frontal installation is more than just a wig choice; it's a precision-based methodology. It relies on tension, adjustable straps, and high-performance styling products instead of chemical adhesives. In the 2026 beauty landscape, the standard has shifted from simply being "glued down" to achieving a high-end "melted" realism. This technique ensures your hair looks like a natural extension of your scalp while prioritizing long-term follicle health. It's the perfect balance of luxury and practicality.
Key benefits of going glue-free include:
- Edge Protection: Eliminates the risk of traction alopecia and thinning caused by harsh adhesives.
- Scalp Breathability: Allows your natural hair and skin to breathe, preventing moisture buildup and irritation.
- Effortless Removal: Provides the convenience of removing your unit every night to maintain your nighttime hair routine.
For the best results, HD lace is the non-negotiable gold standard. Shundietrend HD Lace Frontals feature ultra-thin, high-definition lace that disappears into the skin upon contact. This transparency is vital for a glueless look. It removes the need for heavy glue to mask the lace perimeter, allowing the material to lay flat and invisible against your forehead.
Glueless vs. Traditional Adhesive Installs
Traditional installs use lace glue or tape for multi-week holds. While secure, these chemicals often lead to thinning edges and stubborn residue. A glueless lace frontal installation is designed for daily or short-term wear. It offers a cleaner experience that's much easier for beginners to manage at home. You won't need to spend hours scrubbing away sticky buildup or worrying about the health of your hairline perimeter. It's about achieving a professional aesthetic without the chemical commitment.
Frontals vs. Closures in Glueless Styling
Frontals, typically sized 13x4 or 13x6, offer unmatched versatility compared to closures. They allow for deep side parts and sleek, pulled-back styles. However, securing ear-to-ear lace without glue requires specific techniques. The secret lies in using products like Shundietrend Lace Tint Mousse to match the lace to your skin tone perfectly. While closures only cover a small portion of the forehead, frontals provide a full hairline transformation. Selecting the right lace type for your specific complexion ensures the final result looks seamless, polished, and entirely natural.
Essential Tools for a Flawless Glue-Free Melt
Achieving a professional glueless lace frontal installation requires a curated arsenal of high-performance tools. Many beginners mistakenly reach for "glueless" sprays, but these are often just light adhesives in disguise. A true adhesive-free melt relies on tension and precision-styling products to mimic a natural scalp. Your toolkit must focus on security, customization, and seamless blending to achieve that high-end, salon-quality finish at home. It's about working with the physics of the wig cap rather than relying on chemical bonds.
Your professional "Melt Kit" should include:
- Adjustable Elastic Bands: These are the secret to tension-based security. They pull the lace flat against the forehead for a flush, invisible fit.
- Precision Tweezers: Essential for customizing the hairline and creating a natural, graduated density that mimics real hair growth.
- Skin-Matching Tint: Solutions designed to neutralize the lace grid and match your unique complexion perfectly.
- Tail Combs: Necessary for creating crisp parting and ensuring smooth product distribution during the styling process.
Using these tools correctly ensures your unit remains stable through daily movement. It provides a clean, efficient, and professional experience without the risk of edge damage. You'll enjoy a look that is smooth, precise, and aesthetically perfect.
The Role of Lace Tint Mousse
Color matching is the bridge between a visible lace edge and a realistic hairline. Learning how to use lace tint mousse is essential for anyone seeking a scalp-like finish. Mousse is significantly superior to traditional powders. It saturates the lace fibers rather than sitting on top, which prevents a cakey or dusty appearance. Apply a small amount of mousse to the underside of your HD lace and let it dry completely. This creates a seamless transition that blends with your skin tone for a truly invisible look.
Edge Control and Wax Sticks
Texture and smoothness define the final aesthetic. A hair wax stick is indispensable for flattening the crown and eliminating flyaways. It creates a sleek, professional silhouette that makes the unit look like your natural hair. For the hairline, use a high-quality edge control. It provides a firm hold for sleek styles without leaving a white residue or flaking. To elevate the look, apply a light layer of silk mist spray. This adds a healthy, high-shine finish to your raw human hair. You can find these essentials in the Shundietrend styling collection to ensure your glueless lace frontal installation stays polished and precise.
Preparing Your Natural Hair and the Frontal
A flawless glueless lace frontal installation begins long before you touch the lace. The foundation determines whether your unit looks like a high-end melt or an obvious wig. You need a base that is exceptionally flat and a scalp that is perfectly prepped. Without a smooth surface, the lace will lift, creating gaps that ruin the realism of your style. It's about creating a canvas that allows the lace to disappear.
Start by cleaning your hairline with a gentle cleanser or rubbing alcohol. Removing natural oils and skincare products allows the lace to sit flush against the skin. Additionally, ensure your frontal is sized correctly for your head circumference. A unit that is too large will bunch at the ears, while one that is too small won't provide the necessary tension for a secure, adhesive-free hold. Most professional-grade units accommodate a range of 21 to 23 inches, but checking your specific measurements ensures a precise fit.
The Perfect Braid Down Pattern
A flat braid down is non-negotiable for glueless success. Unlike traditional installs that use glue to bridge uneven surfaces, glueless units require a direct, smooth transition. We recommend 10 to 12 small cornrows braided straight back. This minimizes bulk and ensures the crown remains sleek. Small, tight braids prevent the "hump" effect often seen with larger, bulkier patterns.
Use the "anchor" braid technique by creating a thin, sturdy braid along the entire perimeter of your hairline. This provides a secure point for wig combs or adjustable straps to grip. To maintain hair health, always wear a thin silk or satin cap under your unit. This protects your natural edges from friction while keeping your braids neat and intact. It's a simple step that preserves your natural aesthetic while you enjoy your style.
Customizing the Lace for Realism
True scalp realism comes from meticulous customization. Start by bleaching the knots on your Shundietrend HD Lace Frontal. This process removes the dark "grid" dots where the hair is tied to the lace, making the hair appear to grow directly from your skin. Be careful not to over-process; you want the knots to be a pale blonde color that matches a natural scalp tone.
Plucking is the next essential step. Most frontals come with a dense, uniform hairline that looks unnatural. Use precision tweezers to create a graduated density. The very front should be sparse, gradually becoming thicker toward the back. Finally, when trimming the excess lace, use a zig-zag motion with a razor or pinking shears. A jagged edge mimics the natural irregularities of a human hairline, making the transition from skin to lace completely invisible. This attention to detail creates the professional, high-end look you desire.
Step-by-Step Glueless Lace Frontal Installation Guide
Executing a glueless lace frontal installation requires a blend of precision and patience. You've prepped your natural hair and customized your lace; now it's time for the actual application. This process relies on the physics of tension and the setting power of professional products rather than sticky adhesives. A successful install delivers a look that is secure, breathable, and remarkably realistic. It's the ultimate upgrade for your daily style routine.
Positioning and Initial Security
Symmetry is the foundation of a believable hairline. Start by sliding the unit onto your head, aligning the center of the lace with the bridge of your nose. Pull the ear tabs down to ensure they sit flush against your skin without overlapping your ears. Use the adjustable straps inside the cap to create a snug, comfortable tension. You want the unit to feel firm but not restrictive. Secure the internal combs into the anchor braids you created earlier. This provides the primary stability needed for an all-day hold without any shifting.
The Melting Technique
This phase is where the lace truly disappears. Apply a thin, even layer of lace tint mousse directly along the perimeter of the hairline. The mousse acts as a setting agent that bonds the lace to your skin's texture. Immediately tie down the hairline using a velvet or elastic melting band. Leave this in place for 10 to 15 minutes. The constant, even pressure forces the lace into the skin for a seamless transition. Use a blow dryer on a cool setting to fully set the product before removing the band. The result is a crisp, invisible edge that mimics a natural scalp.
Styling the Hairline
Finishing touches elevate your install from good to professional. Apply a hair wax stick to the crown and use a hot comb to flatten the top of the unit. This eliminates bulk and creates a sleek, salon-quality silhouette. For a polished finish, use a small amount of edge control to define your baby hairs. Focus on soft, swooping motions that complement your face shape. Finally, mist your raw human hair bundles with a light silk spray. This adds a healthy luster and keeps the hair looking vibrant and smooth throughout the day.
Ready to achieve this flawless look yourself? Shop Shundietrend HD Lace Frontals and styling essentials to start your journey toward a perfect, glue-free melt today.
Longevity and Maintenance of Your Glueless Install
Maintaining a glueless lace frontal installation requires a commitment to preservation. Unlike glued installs that stay fixed for weeks, a glueless unit offers the flexibility to refresh your look daily. However, the quality of your hair plays a massive role in how easy this maintenance becomes. Choosing straight human hair bundles is often the smartest choice for glueless enthusiasts. Raw, straight hair is less prone to tangling at the nape and maintains its sleek silhouette with minimal effort. This high-end texture ensures your unit always looks freshly installed, even after several days of wear.
If your lace begins to lift slightly after a few days, don't panic. You don't need a full reinstall to fix a minor gap. Simply apply a tiny amount of lace tint mousse to the area and re-tie it with your melting band for 10 minutes. This quick touch-up reactivates the "melt" and keeps your hairline looking crisp. It's a fast, efficient way to extend the life of your style without damaging your natural edges. Consistent, small adjustments are the key to a professional aesthetic that lasts.
Nightly Routine for Glueless Wigs
Your nighttime routine is the difference between a long-lasting style and a messy morning. Start by detangling your hair with a wide-tooth comb. Always move from the ends up to the roots to prevent tension on the lace. Secure the hair in a low ponytail or two loose braids to minimize friction while you sleep. The most critical tool here is a high-quality satin bonnet. Ensure it covers the entire hairline. This prevents the lace from rubbing against your pillowcase, which can cause lifting or fraying of the delicate HD lace. For those who prefer to keep the unit on for 2 to 3 days, a snug bonnet is your best defense against a shifted frontal.
Product Buildup and Lace Care
HD lace is incredibly thin and fragile. To maintain its transparency, you must keep it free from heavy product buildup. Use a damp, soft cloth to gently wipe away excess mousse or edge control from the lace perimeter every few days. This prevents the "white cast" that can occur when products dry down too thick. This simple cleaning step ensures the lace remains invisible against your skin.
While you should deep condition your raw bundles regularly to maintain their luster, keep conditioners and heavy oils away from the lace itself. Oils can seep into the fibers and cause the unit to slip, compromising the security of your glueless fit. Clean, residue-free lace is the secret to a professional, scalp-like finish that lasts. By prioritizing these small care steps, you protect your investment and keep your natural aesthetic looking flawless.
Elevate Your Aesthetic with Confidence
Mastering a glueless lace frontal installation is the ultimate investment in your hair's health and your personal style. You've learned that precision-based tension and high-quality HD lace eliminate the need for harsh chemical adhesives. By prioritizing a flat foundation and using the right setting tools, you achieve a seamless melt that protects your natural edges. This modern approach offers the convenience of daily removal while maintaining high-end realism. It's about achieving a professional, salon-quality aesthetic from the comfort of your home without compromising your natural hairline.
Ready to transform your look? Shop Shundietrend's Premium HD Lace Frontals and Raw Bundles to experience the difference of 100% Raw Human Hair. Our cuticle-aligned hair ensures zero tangling, while our ultra-thin HD lace provides the ultimate melt for a flawless, invisible finish. Embrace a routine that empowers your natural beauty and enhances your daily confidence. You deserve a sophisticated, reliable partner in your style journey. Your perfect, damage-free transformation starts now.
Frequently Asked Questions
Is a glueless lace frontal installation secure enough for daily activities?
Yes, a glueless lace frontal installation is remarkably secure for your standard daily routine. The combination of adjustable elastic straps and strategically placed internal combs creates a firm, reliable hold. It easily withstands typical movement during work or social outings. For maximum security, ensure your anchor braids are sturdy enough to support the combs. This tension-based system keeps the unit flush against your forehead without any shifting or lifting throughout the day.
How long does a glueless lace frontal installation typically last?
This installation method typically lasts between 1 to 3 days before a quick refresh is needed. The primary benefit is the ease of removal, allowing you to take the unit off every night. This protects your natural edges and allows your scalp to breathe. If you choose to wear it for multiple days, simply re-tie the hairline with a melting band each morning to maintain that crisp, professional aesthetic.
Can I exercise or sweat in a glueless lace frontal?
You can certainly engage in light to moderate exercise. Sweat won't dissolve a chemical bond, which is a major advantage over traditional glued installs. However, heavy moisture can sometimes cause the lace to lift slightly. We recommend wearing a velvet or elastic melting band during your workout. This keeps the lace pressed firmly against your skin while you stay active, ensuring your melt remains intact and polished.
Do I need to wear a wig cap with a glueless install?
Wearing a thin wig cap or a silk cap is essential for a smooth foundation. It provides a consistent surface that helps the unit lay flat against your head. Beyond aesthetics, the cap protects your natural braids from friction and gives the internal combs a secure place to grip. This simple step ensures your glueless unit feels snug and remains symmetrical throughout your busy day.
What is the best type of lace for a glueless installation?
HD lace is the gold standard for a glueless lace frontal installation due to its incredible transparency. This ultra-thin material blends seamlessly with any skin tone upon contact. Because it's so delicate and clear, it doesn't require heavy adhesives to hide the lace grid. It provides the most realistic scalp realism available, making it the perfect choice for an effortless, adhesive-free melt that looks entirely natural.
How do I prevent my glueless frontal from sliding back?
Preventing slippage is all about achieving the right tension. Start by adjusting the interior straps for a snug, comfortable fit that doesn't feel restrictive. Secure the built-in combs into your anchor braids to lock the unit in place. For added security, many enthusiasts use a velvet wig grip band. This accessory provides the necessary friction to keep the lace from moving, even during long hours of wear.
Can I use this method on both raw and virgin hair bundles?
Yes, this method is compatible with both raw and virgin hair bundles. The glueless technique focuses on the cap construction and lace customization rather than the hair type itself. Whether you prefer the longevity of raw hair or the versatility of virgin bundles, the installation process remains the same. High-quality, cuticle-aligned hair ensures your finished style looks luxurious, smooth, and professionally integrated into your daily routine.
How do I remove a glueless lace frontal without damaging my hair?
Removing your glueless lace frontal installation is a quick, damage-free process. Since no glue is used, you don't need harsh chemical removers that can irritate your skin. Simply loosen the adjustable straps and gently slide the combs out of your anchor braids. If there's any product buildup from lace tint mousse, wipe the lace perimeter with a damp cloth. This preserves the HD lace and keeps your natural edges healthy and intact.